Download and Install Binary

Disclaimer: Preview version; content and features subject to change. 

Overview

This tutorial is geared towards any researcher and developer who wants to gain familiarity with VHToolkit 2.0.

Page Contents

RideUnity_LevelSelect

Overview

The VHToolkit 2.0 standalone application features a set of example scenes that display key capabilities of the project. 

Binaries for the VHToolkit 2.0 standalone application are available for the following platforms:

  • Win64
  • macOS

Android, iOS and WebGL support to be explored in future updates.

Disclaimer: Some capabilities and features may not be available on all platforms. All use is governed by the License Agreement

Requirements

Hardware

Refer to Unity documentation for Player applications.

Obtaining the Standalone App

The process is simple to acquire the VHToolkit 2.0 binary executable: 

  1. Submit a VHToolkit 2.0 binary request with desired platform to vhtoolkit@ict.usc.edu.
  2. Download links:
  3. Use the provided password.

Installing and Using the Standalone App 

Instructions for launch and navigation of the VHToolkit 2.0 binary (standalone) application.

Windows

  1. Download the package to your local PC (5 GB or greater of free space recommended) 
  2. Run the installer
  3. Review the license and accept terms
  4. Fill in the earlier obtained password (email vhtoolkit@ict.usc.edu)
  5. Install the files to your preferred location
  6. Run the VHToolkit-IVA2023.exe from the desktop shortcut or start menu

Mac

  1. Download the package to your local PC (5 GB or greater of free space recommended) 
  2. Extract the compressed folder contents at your preferred location
  3. IMPORTANT: Due to macOS security features, the OS may refuse to run the downloaded program
    1. Open a terminal window at the folder location
    2. Input the following to edit the file attributes: xattr -cr “VHToolkit-IVA2023.app”
  4. Run the VHToolkit-IVA2023 app directly

LevelSelect

A simple LevelSelect scene serves as a hub to launch the example scenes for the VHToolkit 2.0 project.

  1. The main menu presents the following choices:
    1. VH Sandbox: Main example project of the VHToolkit 2.0, showcasing how characters can be configured, instantiated, and edited
      1. NOTE: Windows only
    2. VH Sandbox – Minimal: Reduced set of services to that of only non-Windows based cloud services
    3. ExampleNLP: Compare NLP services
    4. ExampleLLM:  Compare LLM models
  2. To exit a scene, press the Escape key to return to the main menu
  3. Close the LevelSelect by pressing Escape key

Scene Information and Instructions

ExampleNLP, see the section below for basic use of this scene. If you wish to customize the scene, see the Add New NLP Service tutorial. 

Visit the other tutorial pages for VH Sandbox Example and Create and Hook Up New Chatbot for specific scene details and instruction.

General Controls

When in a particular scene, the following controls are commonly available: 

  • J: toggles mouse look and WASD “flying” camera
  • F1: toggles UI
  • V: enables speech recognition (keep holding while speaking; release when done)
  • F: toggles webcam
  • Tab: cycle through UI elements
  • (Command +) F11: toggle debug menu
  • ~: toggles the console tool

GUI Debug Menu Navigation

Certain scenes utilize a debug menu that appears in the upper-left corner by default. 

  • If enabled, C key or (Command +) F11 toggles off/on this menu
  • Specific scene functions always appear in the first menu
  • Step to the next menu be either clicking the middle title bar or arrow (>) at the top; click the double-arrow (>>) to expand the console
  • System statistics appear in subsequent menus

Known Issues and Troubleshooting

Windows

Uninstaller
  1. Uninstaller fails to delete Start menu and desktop shortcuts; please remove manually with uninstall of VHToolkit 2.0
Windows speech recognizer unavailable
  1. Ensure under Settings > Speech,  Online speech recognition option is switched to On

Mac

App or dependencies blocked from running by versions of macOS
  1. Open a terminal window at the app folder location
    1. Input the following to edit the file attributes: xattr -cr “VHToolkit-IVA2023.app”/
    2. Run the VHToolkit-IVA2023 app again
  2. Another dialog may may appear blocking a dependency after app launch
    1. Right-click the app in Finder and choose “Show Package Contents”
    2. Open a terminal window at the Plugins location
    3. Input a command similar to the previous step for the app to edit the attributes of the problematic plugin
      1. Example:  xattr -cr “OVRLipSync.bundle”
    4. Run the VHToolkit-IVA2023 app again
Speech input and camera feed not available
  1. If prompted by the OS, enable access to your microphone and webcam

General

Config file out of date and errors when running any example scene 
  1. Update the config file by launching LevelSelect > ExampleLLM scene
  2. Open the debug menu:
    1. Windows, press F11 key
    2. Mac, press Cmd+F11 key, or option + F11; note, may need to enable the option, System Preferences > Keyboard > “Use F1… as standard function keys”
      1. MBP touch bar reference: Apple Support
  3. Config menu appears; if not, click header or arrow of debug menu
  4. Click Reset to Defaults button
  5. Return to LevelSelect and choose desired scene again
Services unavailable and various errors when running any example scene 
  1. Ensure PC has an active Internet connection; majority of all services require Internet except for “local” or “external” Microsoft/Windows services

Example Scenes

VHSandbox
  • AWS Lex v1 selected as both NLP Main and NLP Sentiment will fail and soft-lock input section of UI; as workaround, create new VH, then delete the problematic VH
    • Also occurs with NLP Main as AWS Lex v1 and NLP Sentiment as AWS Lex v2; as workaround, do not use AWS Lex as options in both fields
      • Best practice if using AWS Lex, populate both fields with AWS Lex v2
  • Character utterance audio may repeat and not match text for ElevenLabs voices
  • Delay from click & hold until mic input status change to “listening”
  • Mic input may fail to function with initial click & hold
  • SeaView environment locations run very slow on lower-end hardware
  • Rocketbox characters do not display face mirroring
  • Mobile Speech Recognizer does not function on desktop systems
  • Webcam view may fail to update with creation and/or deletion of multiple characters
  • AWS Polly TTS, corresponding TTS Voice options may fail to populate
  • Windows TTS (External Windows Process) may cause strong head nod at start of utterance for characters
  • NLP Sentiment as AWS Lex v1 or v2 and TTS as ElevenLabs TTS causes VH unresponsiveness and soft-lock input section of UI
  • Rocketbox characters with NLP Main set as AWS Lex v1 or v2 and TTS  as ElevenLabs TTS may cause first utterance to repeat twice
  • NVBG System (Local Integrated Class Library, Windows Only) causes VH unresponsiveness and soft-lock input section of UI
  • Renderpeople Test character does not lipsync
ExampleNLP
  • Google DialogFlow may not function (errors present) on certain versions of macOS
  • Microsoft Azure Virtual Agents (PVA) service disabled
  • “Entities” may not populate depending on service selected

ExampleNLP – Usage and Service Comparison

ExampleNLP
ExampleNLP

Purpose

Shows how to leverage commodity NLP AI services through REST calls, using RIDE’s common web services system.

Leverages RIDE’s generic NLP C# interface, primarily focused on question-answering interactions, with the principle generally working for user input and agent output. Optionally includes sentiment analysis and entity analysis.

Current Providers

  • Microsoft Azure Cognitive Service for Language
  • Amazon (AWS) Lex
  • Google DialogFlow
  • OpenAI GPT-3
  • OpenAI ChatGPT-4

How to Use

IMPORTANT

If you wish to use the ExampleNLP scene and related web services, you must update your local RIDE config file (ride.json). Please back-up any local changes to the file, including your terrain key. Next, restore your Config to default using the corresponding option in the Config debug menu at run-time, then reapply any customization and terrain key. Refer to the Config File page within Support for more information. 

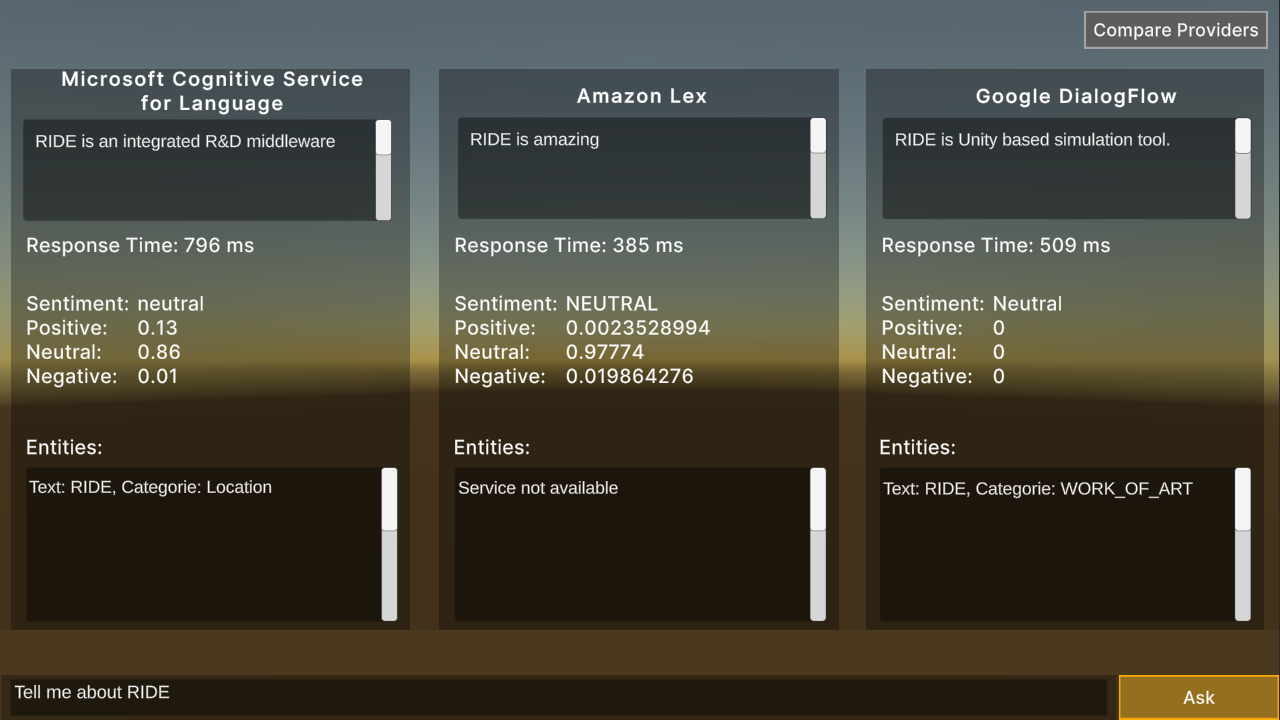
Test the different types of inputs, different lengths of responses, and measure metrics as the average response time for both “hot” and “cold” services.

A service is said to be “cold” when the service requesting the NLP agent makes the very 1st request just after its initialization and deployment and the agent has not been used for a while (here leaving all the respective platform agents idle for >=5 minutes).

When the service requesting the NLP agent has already made very 1st request just after its initialization and deployment, any subsequent service request is considered “hot”.

Single Provider UI

  1. Click Cycle Providers button to cycle through currently available services.
  2. Input text in the bottom field and hit enter or click the Ask button.
  3. The side pane populates with the following information after entering a query:
    1. Response Time
    2. Text Analytics
    3. Entities
  4. If present, a custom or automatic answer will appear between the pane and input field.

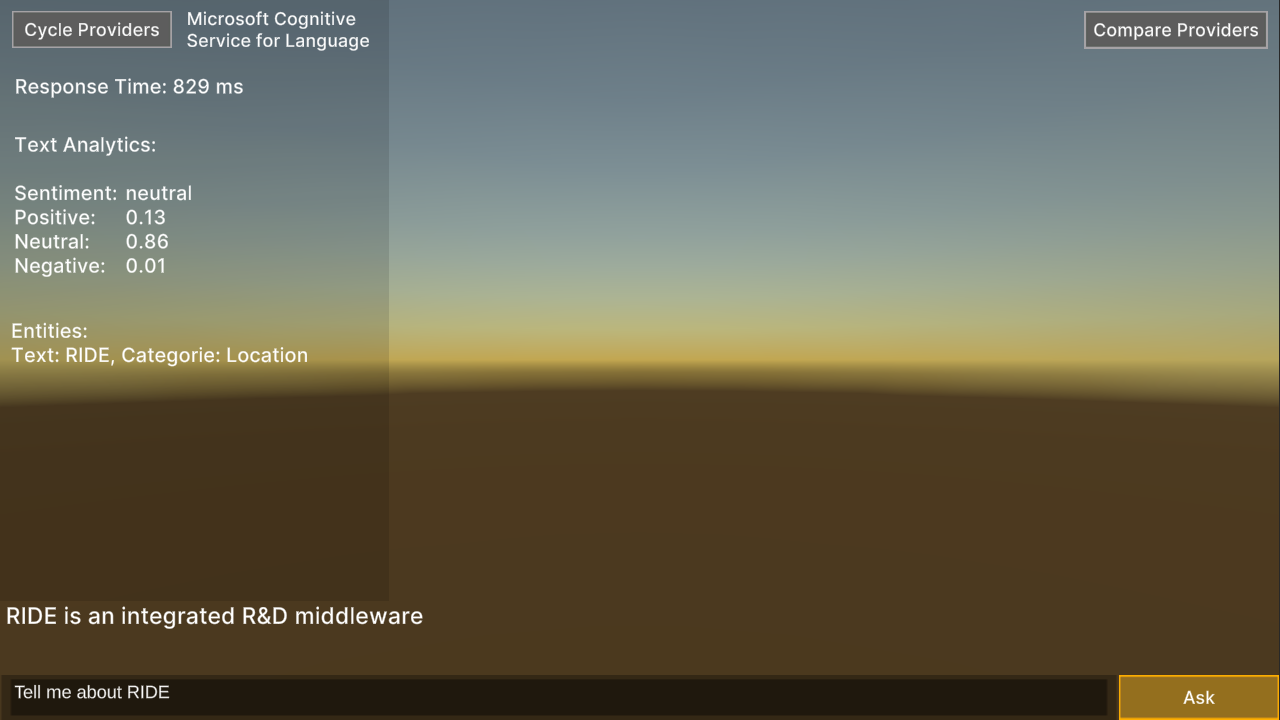
Note that most services are domain specific, with just a handful of questions and answers authored, purely for demonstration purposes. Example question: “What is RIDE?” The exception is OpenAI GPT-3, which is a general purpose language model.

Ask the same question and see how the output differs.

Multiple Provider Comparison UI

  1. Click the Compare Providers button to toggle the live, side-by-side comparison interface.
  2. Input text in the bottom field and hit enter or click the Ask button. Any question will be sent to all 3 providers simultaneously.
  3. Each service has its own pane which populates with the following information after entering a query:
    1. Answer
    2. Response Time
    3. Text Analytics
    4. Entities

Scene Location & Name

Assets/Ride (local)/Examples/NLP/ExampleNLP.unity

Setup Requirements 

The ExampleNLP scene utilizes a customizable UI and interchangeable service providers through canvas, scripts and prefabs. Explore the objects in the Hierarchy view for the scene inside the Unity editor and source for Ride.NLP via the API documentation.

The main script is ExampleNLP.cs in the same folder.

Any NLP option implements the INLPQnASystem C# Interface, which itself is based on INLPSystem. These systems provide the main building blocks to interface with an NLP service:


OpenAIGPT3System m_openAIGPT3;
var openAIGPT3Component = new GameObject("OpenAIGPT3System").AddComponent<OpenAIGPT3System>();
m_openAIGPT3 = openAIGPT3Component;


The specific endpoint and authentication information is defined through RIDE’s configuration system:


m_configSystems = Globals.api.systemAccessSystem.GetSystem<RideConfigSystem>();
openAIGPT3Component.m_uri = m_configSystems.config.openAI.endpoint;
openAIGPT3Component.m_authorizationKey = m_configSystems.config.openAI.endpointKey;


The NLP system encapsulates the user question into an NLPQnAQuestion or NLPRequest object. This user input is sent through the RIDE common web services system. The results are encapsulated into an NLPQnAAnswer  or NLPResponse object. A provided callback function allows a client (in this case this ExampleNLP) what specifically to do with the result. The NLP system itself handles much of the work, so that the client only requires one line to send the user question: 


m_openAIGPT3.AskQuestion(userInput, OnCompleteAnswer);