Overview
The VHToolkit 2.0 example project source code showcases the architecture and key capabilities of the project.
Source code is available for the following platforms:
Requirements
Hardware
Refer to Unity documentation for Editor supported systems.
Obtaining the Source Code
The process is to acquire the VHToolkit 2.0 source code is as follows:
- Submit a VHToolkit 2.0 source code request with desired platform to vhtoolkit@ict.usc.edu.
- Download links:
- Use the provided password.
Installing the Source Code
Instructions for download and setup of VHToolkit 2.0 source code.
Windows
- Download the package to your local PC (20 GB or greater of free space recommended)
- Run the installer
- Review the license and accept terms
- Install the files to your preferred location
Note, no shortcuts or uninstaller included; users must manually delete the VHToolkit2 source code directory.
Mac
- Download the package to your local PC (20 GB or greater of free space recommended)
- Extract the compressed folder contents at your preferred location
- IMPORTANT: Due to macOS security features, the OS may block certain dependencies at run-time; open a terminal window at the IVA project folder
- Input the following to edit the file attributes: xattr -cr “Assets/Ride_Dependencies (local)/SpeechSDK/Plugins/MacOS/libMicrosoft.CognitiveServices.Speech.core.dylib”
- Input the following to edit the file attributes: xattr -cr “Assets/Ride_Dependencies (local)/Oculus/Oculus/LipSync/Plugins/MacOSX/OVRLipSync.bundle”
Prerequisites
- Unity Hub
- Unity version 2022.1.12f1
- VHToolkit 2.0 project source (requires minimum 20 GB of free disk space)
|
IMPORTANT
Note, under 2020.3.x, Microsoft.Extensions.Logging.Abstractions.dll and NonverbalBehaviorGenerator.dll need to be manually excluded from being compiled by unchecking their respective Import Settings inside the Inspector pane.
|
Recommendations
- Version control software (Subversion client TortiseSVN or similar)
- Text or source code editor (Notepad++ or similar)
VCS Subversion Client – TortiseSVN
Version control software (VCS) allows the tracking of individual file changes inside of a code base. In the event a “breaking” code change is committed, these changes can be easily compared against prior versions of the file(s) using the VCS client, and the file(s) reverted to another “known good” version.
- Navigate to https://tortoisesvn.net/
- Download, install and configure latest TortiseSVN Subversion client
- Note, TortiseSVN is Windows only; alternative Subversion clients exist for macOS and Linux
Text or Source Code Editor – Notepad++
Advanced text editors tailored to script and source code will help avoid mistakes that can occur when editing these types of files in a standard text editor or word processor.
- Navigate to https://notepad-plus-plus.org/
- Download and install latest Notepad++
- Note, Notepad++ is Windows only; suitable alternatives exist for macOS and Linux
Unity Hub Installation
The Unity Hub utility controls which versions of the platform are installed on the local machine.
- Navigate to https://unity3d.com/get-unity/download
- Click “Download Unity Hub” button.
- Download and install Unity Hub.
- Run the application, and proceed to create an account or login.
- Inside Preferences, License Management, choose Activate New License option.
- Complete License Agreement.
Refrain from acquiring any version of Unity from the Hub for the moment. See next section for Unity installation steps.
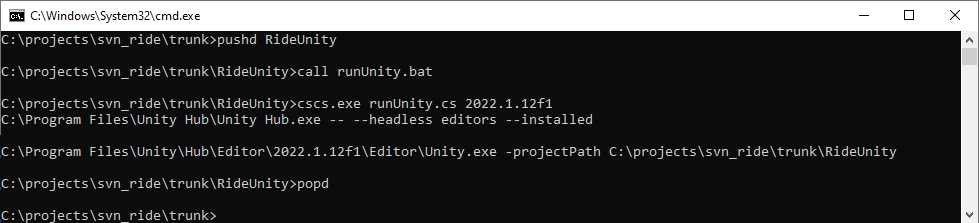
Windows – Unity Editor Installation Using runUnity.bat
With Unity Hub now installed, locate the runUnity.bat file at the top level of the IVA project. When first initialized, this process calls Unity Hub for a “headless” (background) automatic installation of the proper version of the Unity editor and modules for the project. (Remain connected to the Internet during the next set of steps.)
- Recommend for first-time launch with runUnity.bat that it’s initialized through the command line; using this method displays the status of the process and any errors.
- On Windows, open File Explorer to the directory with runUnity.bat.
- Click in the address bar and clear the path text.
- Type “cmd” in the field and press Enter; a command prompt will appear with the current directory path.

- Type “runUnity” and press Enter.
- Wait for the “headless” process to download and install the Unity target version via Unity Hub; this can take a while.
- When complete, Unity will initialize and begin to ingest the project files and build a local library; this too can take a while.
- After the local library creation finishes, the Unity application will open to the IVA project.
- If successful, subsequent launches of the project can be done with runUnity.bat directly, no need to use the command line.
|
Important
Always use runUnity.bat to open the RIDE Unity development environment. This will ensure you are using the correct version of Unity every time.
|
|
Tip
If the “headless” installation process fails, the desired version can be acquired through the Unity Archive page, https://unity3d.com/get-unity/download/archive
- Select the option from the page to download and install the desired version through Unity Hub; installation can take a while.
- Note, Unity Hub will prompt for a license if not already present; create an account or login, and then complete the License Agreement process.
- After installation completes, relaunch runUnity.bat in order to initialize Unity and create the local project library; this too can take a while.
- Once the local library creation finishes, the Unity application will open to the IVA project.
|
MacOS – Unity Editor Installation via Unity Hub
With Unity Hub now installed, the desired version can be acquired through the Unity Archive page, https://unity3d.com/get-unity/download/archive
- Select the option from the page to download and install the desired version through Unity Hub; installation can take a while.
- Note, Unity Hub will prompt for a license if not already present; create an account or login, and then complete the License Agreement process.
- After installation completes, from the Unity Hub, choose Open, Add project form disk.
- Select the local IVA project directory.
- Click its entry to launch the project.
- Unity will create a local project library with first launch, which can take a while.
- Once the local library creation finishes, the Unity application will open to the IVA project.
Using the Source Code
LevelSelect
A simple LevelSelect scene serves as a hub to launch the example scenes for the VHToolkit 2.0 project.
Location: /Assets/Scenes/LevelSelect
- The main menu presents the following choices:
- VH Sandbox: Main example scene of the VHToolkit 2.0, showcasing how characters can be configured, instantiated, and edited
- VH Sandbox – Minimal: Reduced set of services to that of only non-Windows based cloud services
- ExampleNLP: Compare NLP services
- ExampleLLM: Compare LLM models
- To exit a scene, press the Escape key to return to the main menu
- Close the LevelSelect by pressing Escape key
Scene Information and Instructions
Visit the other tutorial pages for specific scene details and instruction.
General Controls
When in a particular scene, the following controls are commonly available:
- J key toggles mouse look and WASD “flying” camera
- ~ key toggles the console tool
GUI Debug Menu Navigation
Certain scenes utilize a debug menu that appears in the upper-left corner by default.
- If enabled, C key or F11 toggles off/on this menu
- Specific scene functions always appear in the first menu
- Step to the next menu be either clicking the middle title bar or arrow (>) at the top; click the double-arrow (>>) to expand the console
- System statistics appear in subsequent menus
Known Issues and Troubleshooting
Windows
Uninstaller
- Uninstaller fails to delete Start menu and desktop shortcuts; please remove manually with uninstall of VHToolkit 2.0
Windows speech recognizer unavailable
- Ensure under Settings > Speech, Online speech recognition option is switched to On
Mac
App or dependencies blocked from running by versions of macOS
Due to macOS security features, the OS may block certain dependencies at run-time. Use the following workaround for any prompts received:
- Open a terminal window at the IVA project folder
- Input the following to edit the file attributes: xattr -cr “Assets/Ride_Dependencies (local)/SpeechSDK/Plugins/MacOS/libMicrosoft.CognitiveServices.Speech.core.dylib”
- Input the following to edit the file attributes: xattr -cr “Assets/Ride_Dependencies (local)/Oculus/Oculus/LipSync/Plugins/MacOSX/OVRLipSync.bundle”
- Play the VHSandbox – Minimal scene again
Speech input and camera feed not available
- If prompted by the OS, enable access to your microphone and webcam
General
Config file out of date and errors when running any example scene
- Update the config file by launching LevelSelect > ExampleLLM scene
- Open the debug menu:
- Windows, press F11 key
- Mac, press Cmd+F11 key, or option + F11; note, may need to enable the option, System Preferences > Keyboard > “Use F1… as standard function keys”
- MBP touch bar reference: Apple Support
- Config menu appears; if not, click header or arrow of debug menu
- Click Reset to Defaults button
- Return to LevelSelect and choose desired scene again
Services unavailable and various errors when running any example scene
- Ensure PC has an active Internet connection; majority of all services require Internet except for “local” or “external” Microsoft/Windows services
Example Scenes
VHSandbox
- AWS Lex v1 selected as both NLP Main and NLP Sentiment will fail and soft-lock input section of UI; as workaround, create new VH, then delete the problematic VH
- Also occurs with NLP Main as AWS Lex v1 and NLP Sentiment as AWS Lex v2; as workaround, do not use AWS Lex as options in both fields
- Best practice if using AWS Lex, populate both fields with AWS Lex v2
- Character utterance audio may repeat and not match text for ElevenLabs voices
- Delay from click & hold until mic input status change to “listening”
- Mic input may fail to function with initial click & hold
- SeaView environment locations run very slow on lower-end hardware
- Rocketbox characters do not display face mirroring
- Mobile Speech Recognizer does not function on desktop systems
- Webcam view may fail to update with creation and/or deletion of multiple characters
- AWS Polly TTS, corresponding TTS Voice options may fail to populate
- Windows TTS (External Windows Process) may cause strong head nod at start of utterance for characters
- NLP Sentiment as AWS Lex v1 or v2 and TTS as ElevenLabs TTS causes VH unresponsiveness and soft-lock input section of UI
- Rocketbox characters with NLP Main set as AWS Lex v1 or v2 and TTS as ElevenLabs TTS may cause first utterance to repeat twice
- Binary only: NVBG System (Local Integrated Class Library, Windows Only) causes VH unresponsiveness and soft-lock input section of UI
- Renderpeople Test character does not lipsync
ExampleNLP
- Google DialogFlow may not function (errors present) on certain versions of macOS
- Microsoft Azure Virtual Agents (PVA) service disabled
- “Entities” may not populate depending on service selected