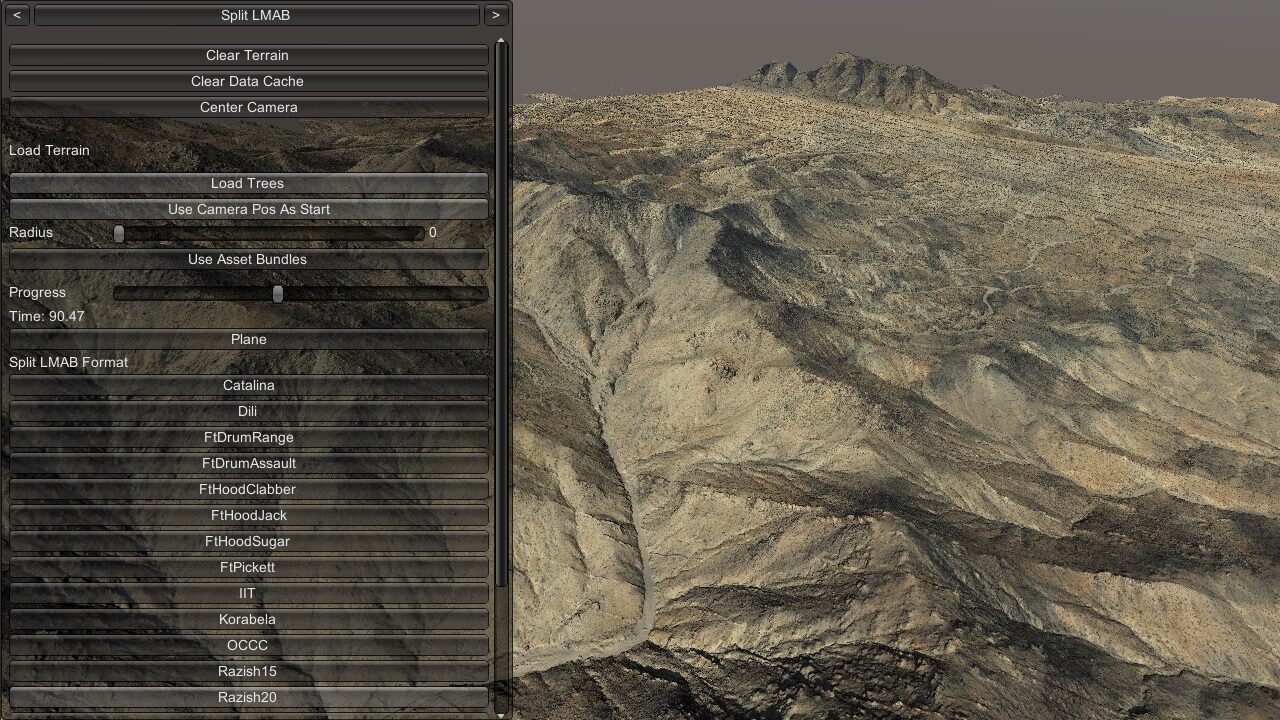
This page is divided into two sections; the first outlines the example scene for demonstration purposes and the second details programmatic loading methods and parameters.
Check the Terrain Library for currently available terrain maps.

Examine available terrain maps in Split LMAB or LMAB formats, selecting between different LOD settings.
The terrain panel appears by default on scene launch and is divided into the following options:
|
Tip If steaming terrain on a mobile device (Android/iOS) strongly recommend setting the Radius to a value of < 800 to avoid running out of device memory. |
|
Important The steaming of Single LMAB terrain maps, with the exception of those with the “s3” location designation, only function while on the ICT domain. If remote, ensure your ICT VPN is active. |
|
Tip Navigation Controls:
Note, terrain loading menu cannot be toggled off currently. Use the top arrows to switch to the smaller system menu. |
Assets/Ride/Examples/LoadTerrain/ExampleLoadTerrain.unity
Utilize the terrain loading capability and interface for your scene with the ExampleLoadTerrain script.
Simply add this script to an empty game object in your scene: Assets/Ride/Examples/LoadTerrain/ExampleLoadTerrain.cs
Normally terrain in the Split LMAB format streams into the scene at run-time via network or datacache folder, otherwise not appearing when working “offline” in the Unity Scene panel to create/edit a scene. Instead of using the network or datacache for run-time streaming, a terrain map can be instanced in a local scene by way of the Load Tiles script and Single LMAB terrain map format.
|
Important This method should only be done in special cases, as the resulting scene file can be >1GB in size, and will greatly increase the size of a standalone build, as terrain streaming is no longer used. Additionally, the initial loading of the Single LMAB terrain format into the scene must be done while on the ICT domain. If remote, ensure your ICT VPN is active. |
AI Units require a navigation mesh in order to utilize the terrain for simulations. Refer to Creating a Navigation Mesh from OWT Data for how to add a nav mesh to a scene.
The following examples describe basic and advanced methods to load terrain in a custom scene.
Passing no parameters to LoadTerrainParams() will use all defaults, and load a simple plane instead of an OWT map.
Ride.Globals.api.terrainSystem.LoadTerrain(new Ride.Terrain.Terrain.LoadTerrainParams());
Specifying a path allows you to load a given terrain. The path can be a local path, a network path, or a web url.
string path = "[Exaple terrain path]";
Ride.Globals.api.terrainSystem.LoadTerrain(new Ride.Terrain.LoadTerrainParams() { path = path, useTiles = true });
If the terrain contains LODs, you also have to specify a LOD, otherwise, it will load all the LODs contained in the terrain.
string path = "[Exaple terrain path]";
string lod = "L16";
Ride.Globals.api.terrainSystem.LoadTerrain(new Ride.Terrain.LoadTerrainParams() { path = path, lod = lod, useTiles = true });
If your scene has a GOList GameObject populated with data, you can refer to the Terrain Paths array by specifying which index to use for loading.
int pathIndex = 0;
string lod = "L16";
Ride.Globals.api.terrainSystem.LoadTerrain(new Ride.Terrain.LoadTerrainParams() { pathIndex = pathIndex, lod = lod, useTiles = true });
LoadTerrainParams has many options for loading the terrain in different ways. Here are all the parameters:
public class LoadTerrainProgress
{
    public float overallProgress;
    public bool renderLoadFinished;
    public bool physicsLoadFinished;
}


public class LoadTerrainParams
{
    public string path;   // set path or pathIndex, not both
    public string pathcrc;  // this is the path to a .crc file containing the crc for the description file.  Only used if useTiles = true.  keep as null if you don't want to check the crc
    public int pathIndex = -1;
    public string lod;
    public bool loadPhysics = true;
    public bool loadTrees = true;
    public bool useTiles = false;
    public DataCache dataCache;
    public string gameObjectRootName;
    public RideVector3 startLoadingPriorityPosition;  // prioritize loading of tiles based on the distance from this position
    public int renderRadius = -1;
    public IProgress loadTerrainProgress;
}
This class is updated whenever progress happens during the LoadTerrain() process
Here is an example of loading a terrain using the advanced usage.
var terrainPath15 = "[Exaple terrain path]";
var terrainPath15crc = terrainPath15 + ".crc";
m_terrainProgress = new Ride.Terrain.LoadTerrainProgress();
m_terrain = Ride.Globals.api.terrainSystem.LoadTerrain(new Ride.Terrain.LoadTerrainParams()
{
    path = terrainPath15,
    pathcrc = terrainPath15crc,
    loadPhysics = true,
    loadTrees = false,
    useTiles = true,
    gameObjectRootName = "Razish",
    startLoadingPriorityPosition = camera.transform.position,
    //renderRadius = 1000,
    loadTerrainProgress = new Progress((progress) =>
    {
        m_terrainProgress = progress;
    })
});