
Demonstrates how to use Unity’s Timeline package with the RIDE API’s mechanics.


Assets/Ride/Examples/Timeline/TimelineCompilation.unity
Right-click on the Timeline window/Track Group to create grouping for Timeline tracks. Drag tracks in/out of the group to organize tracks by category.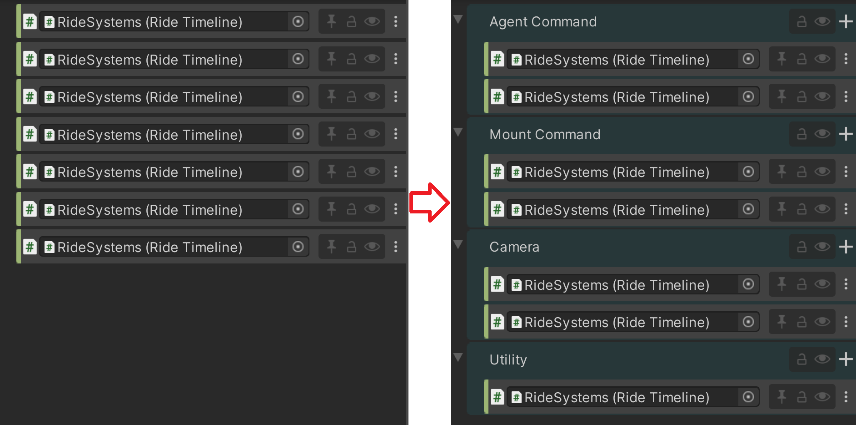
Timeline Directors can be nested, but it is not recommended to do so in RIDE as it will limit the functionality such as Timeline Condition Checks. A child Director will follow the time flow of the parent Director, so Conditional Checks will have no effect on the child Director.
Clicking the lock icon located to the top-right of the Timeline window will hold the currently selected Director from the Hierarchy window in view regardless of subsequent item selection.
The transform gizmo will appear in the Scene window for certain Timeline clips, such as for spawning and moving. Click and drag the gizmo’s handles to change the location/position parameter when editing for easier value manipulation compared to manual entry.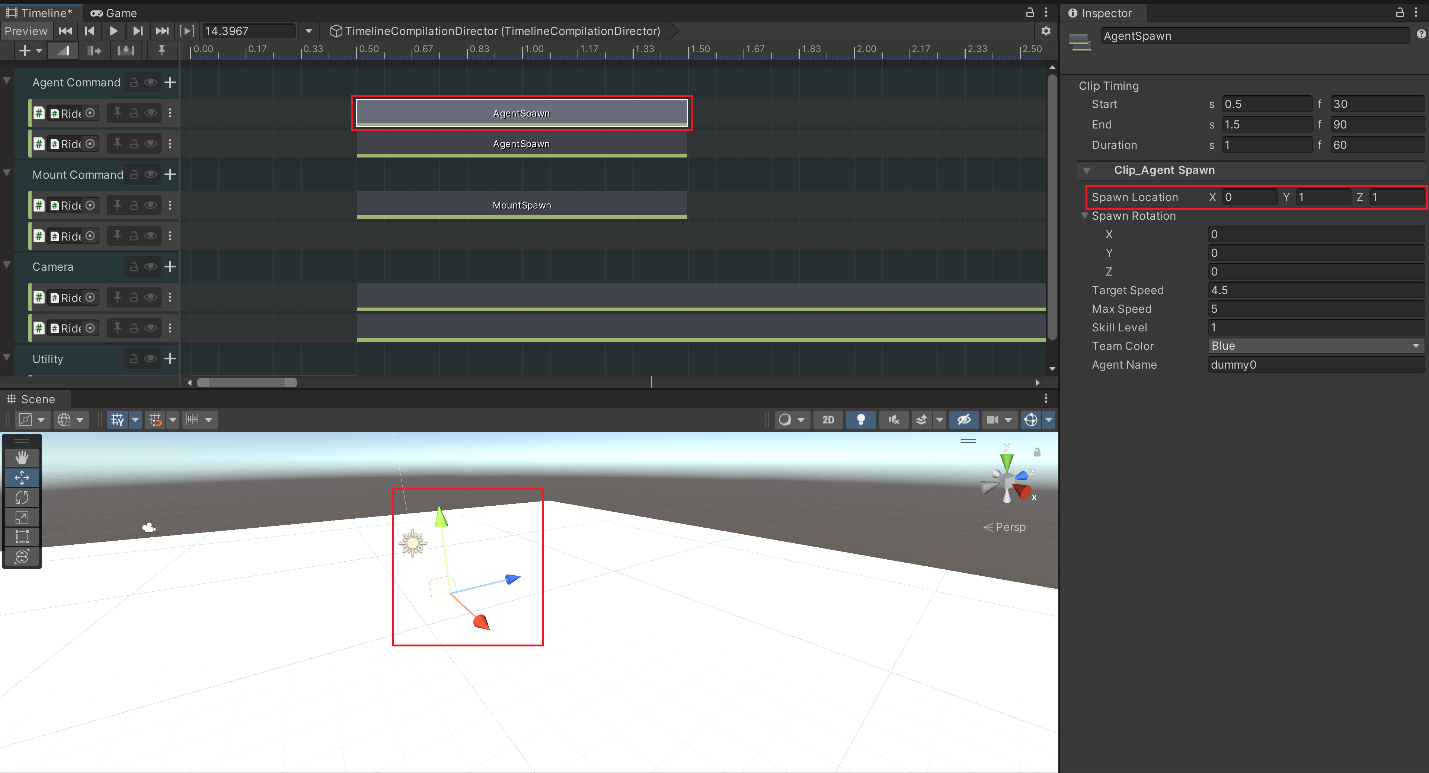
Timeline in RIDE mostly follows the structure as set by Unity. Please refer to the official documentation for more details: https://docs.unity3d.com/2018.3/Documentation/ScriptReference/Timeline.TimelineAsset.html
Description: Command agent to move to location.
Parameters:
Move to Location: position agent will be commanded to move to. Can be manipulated with transform handle gizmo in the Scene window.
Move to Object: position of the object agent will be commanded to move to. Using this parameter will make Move to Location to be ignored. Activate by dragging an object from Hierarchy window to it.
Agent Name: Name of the agent that command is issued out to.
Note: An agent with a matching Agent Name must exist in the scene.
Description: Command agent to change posture.
Parameters:
Posture: Type of posture.
Agent Name: Name of the agent that command is issued out to.
Note: An agent with a matching Agent Name must exist in the scene.
Description: Command agent to shoot another agent.
Parameter:
Agent Name: Name of the agent commanded to shoot.
Target Name: Name of the agent that will be shot.
Note: Agents with Agent Name and Target Name must exist in the scene.
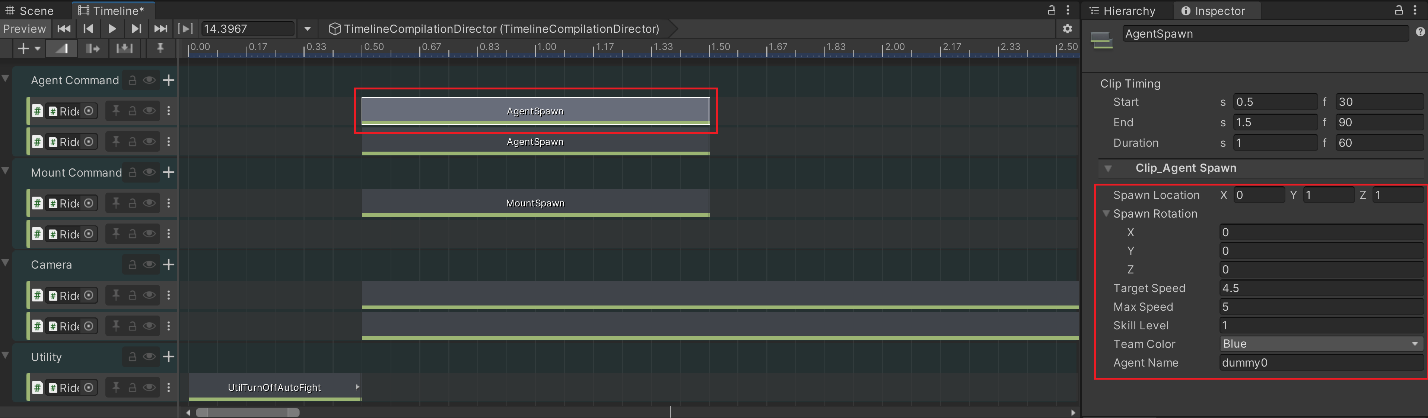
Description: Command agent to be spawned in the scene.
Parameters:
Spawn Location: Position in the world where an agent will be spawned in.
Spawn Rotation: Rotation of the agent will be spawned in.
Target Speed: Value of agent’s target speed.
Max Speed: Value of agent’s max speed.
Skill Level: Skill Level of the agent.
Team Color: Agent’s team.
Agent Name: Name of the agent.
Note: Spawn Location must be a valid position in the world.
Description: Command group of agents to initiate an ambush. (https://ride.ict.usc.edu/support/documentation/examples/battle-drills-react-to-ambush-near/)
Parameters:
Group Name: Name of the group command is issued out to.
Note: Group with Group Name must be present in the scene. Another group of agents must be given a command to react to ambush. Region prefab must be present in the scene.
Description: Command group of agents to walk into position in the world, where they will walk and react to ambush. (https://ride.ict.usc.edu/support/documentation/examples/battle-drills-react-to-ambush-near/)
Parameters:
Move to Location: Position in the world where the group will move to.
Group Name: Name of the group command is issued out to.
Note: Group with Group Name must be present in the scene. Another group of agents must be given a command to react to ambush. Region prefab must be present in the scene. Agents must walk inside the region to initiate ambush event.
Description: Command group of agents to move in formation.
Parameters:
Move to Location: Position in the world where the group will move to.
Move to Object: position of the object agent will be commanded to move to. Using this parameter will make Move to Location to be ignored. Activate by dragging an object from the Hierarchy window to it.
Formation Type: Type of formation group will move in.
Group Name: Name of the group command is issued out to.
Note: Group with Group Name must be present in the scene.
Description: Command group of agents with a size of fire team to be spawned in the scene.
Parameters:
Spawn Location: Position in the world where a fire team will be spawned in.
Spawn Rotation: Rotation of the fireteam that will be spawned in.
Team Color: Fireteam’s team.
Agent Name: Name of the group.
Note: Spawn Location must be a valid position in the world.
Description: Disable camera.
Parameters:
Camera: Camera that command is given out to.
Note: Camera parameter cannot be null.
Description: Enable camera.
Parameters:
Camera: Camera that command is given out to.
Note: Camera parameter cannot be null.
Description: Command camera to follow an entity in the scene.
Parameters:
Camera: Camera that command is given out to.
Entity Name: Name of the entity that camera will follow.
Camera Offset: Vector value that camera will be away from the entity.
Camera Rotation: Rotational value of the camera.
Focus on Agent: Checking this option will override Camera Rotation and camera will focus on the entity.
Note:
Camera parameter cannot be null.
There must be entity with matching Entity Name must exist in the scene.
The length of the clip determines the duration of the command.
Description: Camera will move along the track/curve in the scene.
Parameters:
Camera: Camera that command is given out to.
Curve: Curve that camera will follow.
Travel Duration: How long it will take for the camera to finish following the track.
Note:
Camera and Curve parameter cannot be null.
Travel Duration does not guarantee the duration of the clip. Length of the clip must match the Travel Duration to guarantee the camera to finish travelling the track from start to finish.
Object with VhAssetsBezierCurveSystem component must be present in the scene. This object must be added to Curve System parameter inside the RideTimeline component in the RideSystems prefab.
Curve must be present in the scene.
Description: Set field of view (FOV) of the camera.
Parameters:
Camera: Camera that command is given out to.
FOV: Value of FOV that camera will set to.
Note: Camera parameter cannot be null.
Description: Lerp Camera’s current position + rotation to another position + rotation.
Parameters:
Camera: Camera that command is given out to.
Target Position: Position in the world that camera will move to.
Camera Rotation: Rotational vector that camera will rotate to.
Speed: How fast this command is carried out.
Note:
Camera parameter cannot be null.
Length of the clip determines the duration of the command.
Description: Camera will focus on the entity in stationary position.
Parameters:
Camera: Camera that command is given out to.
Entity Name: Name of the entity that camera will focus on.
Note:
Camera parameter cannot be null.
Length of the clip determined the duration of the command.
Description: Camera will look at given position in stationary position.
Parameters:
Camera: Camera that command is given out to.
Target Position: Name of the entity that camera will focus on.
Note: Camera parameter cannot be null.
Description: Camera will teleport to given position in the world.
Parameters:
Camera: Camera that command is given out to.
Position: Position in the world where camera will teleport to.
Rotation: Rotational value that camera will be set to.
Note:
Camera parameter cannot be null.
Activating this command will not turn the camera on.
Description: Turn off current camera and turn on the camera set in the parameter.
Parameters:
Camera: Camera that will be turned on.
Note:
Camera parameter cannot be null.
Description: Fade out object’s material until it becomes transparent.
Parameters:
Renderer List: List of objects that command will be issued out to.
Note: Material and shader of the object may prevent this command from being performed effectively.
Description: Spawn region object in the scene.
Parameters:
Spawn Location: Position in the world where region will be spawned in.
Scale: Scalar value for region’s size.
Note:
This command is essential part of setting up ambush behavior.
Only agents that were spawned before region is spawned will be processed for ambush behavior.
BD_GenerickKillZone prefab must be added to Region Prefab parameter inside the Ride Timeline component in the RideSystems prefab.
Description: Command mount to aim at position/object in the scene.
Parameter:
Target Object: Command mount to aim at this object.
Target Location: Command mount to aim at this position.
Mount Name: Name of the mount command is issued out to.
Note:
Using Target Object parameter will override Target Location.
Aiming process may take some mount to take time to finish.
Mount with matching Mount Name must be present in the scene.
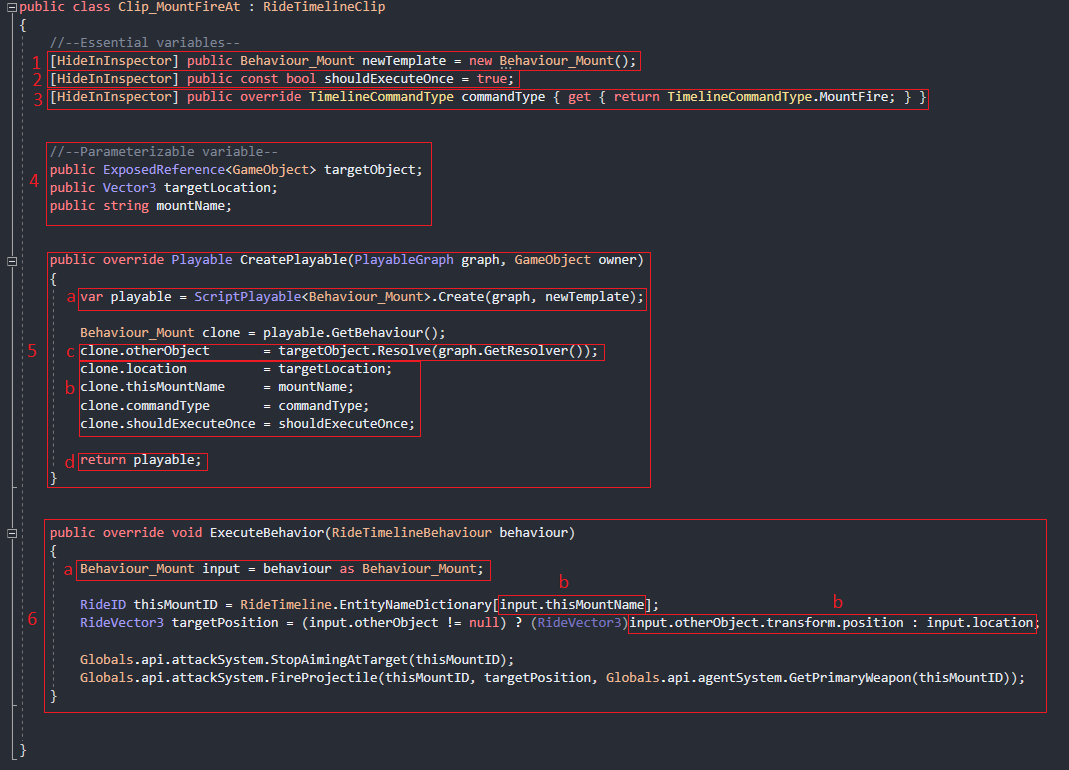
Description: Command mount to fire at position/object in the scene.
Parameter:
Target Object: Command mount to fire at this object.
Target Location: Command mount to fire at this position.
Mount Name: Name of the mount command is issued out to.
Note:
Using Target Object parameter will override Target Location.
Projectile may miss the target if aiming is unfinished.
Mount with matching Mount Name must be present in the scene.
Destructible objects must be added to RideTimeline component inside RideSystems prefab’s RideTimeline component to utilize destructible object.
Description: Command mount to move to given position/object in the scene.
Parameter:
Move to Object: Command mount to move to this object’s position.
Move to Location: Command mount to move to this position.
Mount Name: Name of the mount command is issued out to.
Note:
Using Move to Object parameter will override Move to Location.
Mount with matching Mount Name must be present in the scene.
Description: Spawn mount in the scene
Parameter:
Spawn Location: Position in the world where mount will spawn in.
Spawn Rotation: Rotational value that mount will spawn in.
Mount Type: Type of mount that will be spawned.
Mount Name: Name of the mount that will be used as ID.
Note: Spawn Location must be valid value within the scene.
Description: Turn off auto fight flag in the scene. Agents with opposing faction will not automatically start combat.